Construction
The suit of armour being made is an accurate reproduction of armour from the latter half of the 15th. Century. The second half of the fifteenth Century produced armour of the most beautiful form and design. It possessed graceful lines and excellence of workmanship that characterised the Gothic style, as it came to be known. Probably the finest example of this armour is seen in the Wallace Collection in London in the form of a complete 'war harness' for man and horse dating from around 1460, and it is on this armour that the suit being made is, to a degree, based. The picture on the home page of this site is of a suit of armour made previously and the finished armour I am making will be similar to this - although I will be making some changes to the design of various pieces as work progresses. It is never necessary to slavishly copy any one complete suit of armour anyway, as practically all suits of armour still in existence are composite, often being made up of a number pieces from different sources.
Although the armour being made is life-size and could be worn, it is intended for display purposes and so it is necessary first to make a wooden mannequin on which to hang it. This can take a number of forms, but I have found the easiest approach is to cut the shapes out of MDF ( I will post an image of the mannequin on it's own at some stage in the project, but do not have one to hand at present ).
The design and shape of each piece, taken from studying photographs and original pieces of armour, is made up in cardboard patterns initially. These are placed on the metal sheet and their outline transferred with a felt marker pen. The shape is then cut from the steel using the shears illustrated on the previous page. The piece is then curved, shaped and embellished as necessary before being drilled and riveted into place.
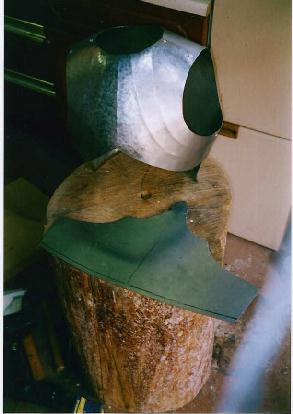
The first piece to be made is the breastplate or cuirass. This is made in three sections, one that comprises the back and two sections that form the front. Fig. 1 shows the back fitted to the upper part of the front of the cuirass with the lower half of the front section cut out and ready for 'doming'.
The next image, Fig. 2, shows the lower half of the front section of the cuirass after doming and prior to adding the decorative detail ( the cardboard template used for this piece can be seen behind the domed steel section ). I shall not describe in detail the doming process for the lower part of the cuirass here, as the technique is essentially the same for each piece and it will be easier to demonstrate on a somewhat smaller piece just a little further on in the construction.

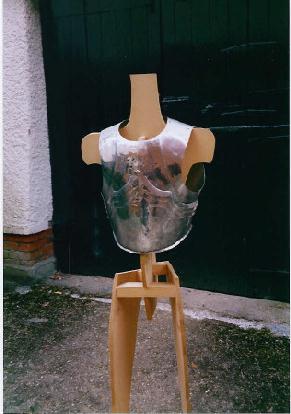
Detailing is now added to the top of the domed lower section ( again the technique for adding detailing and embellishments will be demonstrated a little further on ). The sections are then polished and fitted together using just one rivet each side and a flat-headed screw in the centre. Fig. 3 shows the finished cuirass in place on the mannequin.
On the next page I shall be making the front and rear tassets, which are articulated plates forming a skirt attached to the bottom of the cuirass.